


2001 5pin Style C5 Maf Conversion
E-mail jmX with corrections
Click here for a printable version
Table of contents- Tools/Supplies needed- Preface - The Swap - FAQ |
| Tools Needed: |
- Flathead screwdriver |
| Parts/supplies you will need: |
Parts: - 2001+ Style 5 pin Mass Airflow Meter with LS1 Calibration from  OR - 2001+ Style 5 pin Mass Airflow Meter with no calibration modification (requires LS1Edit) - Wiring Adapter Harness for IAT/MAF into 5 pin connection from - 2001+ Air bridge and bellow, or aftermarket equivalent for 2001+ model years (GMPN may be 25314820) - Intake box or filter that will accept a larger 2001+ style MAF (i.e. a Blackwing, or OEM 2001+ airbox) |
Preface
| In 2001, GM changed the
format of the mass air flow meters on C5 Corvettes. In previous years, the MAF
(Mass Air Flow) meter and IAT (Intake Air Temperature) sensor were 2 separate
pieces, both having their own wiring connector. The 2001 setup combines the MAF
and IAT into one unit and rather than having 2 wiring connectors, there is one
5 pin setup. It is a cleaner and simpler setup and the parts to convert to the
new style are cheap and readily available. There are a few ways to tackle this conversion. The easiest is to buy the adapter wiring harness and LS1 calibrated MAF from PACE parts. The need for the re-calibration is due to the fact that the MAF flow table resides in the PCM (Powertrain Control Module) and your MAF and that table need to match. The 2001+ style maf's have a fairly different flow curve and PACE therefore modifies their maf to match more closely what your stock PCM is expecting. Another option for 1999 and 2000 year models only, is to buy a non-calibrated MAF, along with the wiring adapter, and then use LS1-Edit to change your PCM's table over to the new MAF table. This is probably the more "proper" way to do this modification, however reprogramming is expensive and daunting to most people. The '97 and '98 years can use this method too, however your maf metering will be insufficient for higher output engines as the table in the computer runs out of data at the frequencies the uncalibrated maf returns. The following graph illustrates the calibration differences between the years. 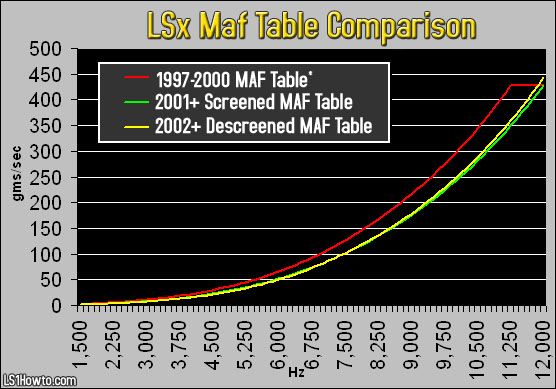 Note:'97-'98 MAF tables end at 11,250Hz. Once you figure out which way you want to go with the MAF, you'll need to acquire a 2001+ air bridge and coupler. Many new car guys buy aftermarket air bridges and may have their old stock stuff for sale for a few bucks. If you can't find some used stock stuff off a new car, you can try to buy a new one from any GM dealership (GMPN may be 25314820). If that fails,there are several vendors that sell aftermarket airbridge units. You'll need to buy the setup for 2001+ year model cars, regardless of the actual year model of your car since you will be converting. The last hurdle is making sure your intake setup can accept the larger diameter MAF meter. I, like many others, had the blackwing setup. The blackwing opening itself is setup to handle the larger MAF, and uses a rubber adapter to size down to the old style maf...so if you have a blackwing currently, you're set to go. Other intake setups are probably similar. |
The parts

|
These are the parts you'll need to complete the job, in addition to an intake system that will accept the larger MAF (i.e. blackwing or any aftermarket setup for 2001+ year model C5's) |
The Swap
Time To Complete: 20-60 minutes

|
Let's dig in. Your engine bay should
look something like this. In the photo the Blackwing air filter is shown,
however yours may be different. Start by disconnecting the 2 wire connector
going into the drivers side of your air bridge. That is the IAT sensor. Next,
disconnect the 3 wire connector going into your MAF (near the
airbox/airfilter). Once the wires are disconnected, take a flathead screwdriver and loosen the clamp where your air bridge coupler attaches to the metal throttle body. Now, your air bridge will be pressed down onto 2 rubber pegs coming out of your radiator shroud. Pull up on the air bridge and work the air bridge off the pegs. If your air box/filter is bolted to the car anywhere, unbolt it now. (NOTE: If your intake setup is very involved, you may leave it mounted in the car. In this case, loosen the clamp that holds the MAF meter to the intake ducting and pull the MAF off of your aftermarket intake setup). Finally, pull the whole intake assembly (MAF/Bridge/coupler and possibly intake box/filter) back off of your throttle body and remove from the car. |

|
You should now have something that
resembles the setup shown in the picture on the left. On the left side is the stock setup, and on the right side the parts you need for the conversion are shown. If you have not assembled the parts you purchased yet, now is the time to do it. |

|
If you pulled your MAF out along with your intake setup, you'll need to loosen the clamp that holds the MAF in it using a flathead screwdriver. Once loose, work the MAF meter out from the intake. Be careful not to touch the small wires inside the meter or it may be ruined. |

|
If you were using a Blackwing air filter, you'll have a rubber adapter ring fitting on the end of it. Pull it out and keep it with your old maf. With the new larger MAF, you'll not be needing the adapter any longer. |

|
Before we start the reinstall, now is a good chance to compare the size of the old setup compared to the new. The 2001+ style MAF meters are between 1/4" and 1/2" larger in inner diameter, which should translate to a little more flow once your engine is modded down the road. |

|
If you pulled your intake setup out along with the MAF/Bridge, then go ahead and connect it to the new MAF/Bridge setup now, and tighten down the MAF. You should have a setup now that looks exactly like what you pulled out, with a few differences. You'll notice the new air bridge has no hole for the IAT sensor since your 5 pin MAF has the IAT built in. |

|
Now work the assembly back into the engine bay and press the air bridge down onto the pegs as it was before. Slide the coupler back onto the throttle body and tighten the clamp down with a flathead screwdriver. If your intake box/filter needs to be secured to the car, do that now as well. |

|
Finally, connect up your 5 pin wiring adapter and plug the 2 stock wiring plugs and you're done! |

|
Optional - Requires LS1Edit softwareIf you did not buy the LS1 calibrated MAF, then now is the time to break out LS1EDIT and change over your MAF tables. The tables below show you the 2 tables you can use, depending on if you are using a de-screened maf or a screened maf.You'll need to grab your stock program and open it up to the maf flow tables. You'll notice the table starts at 1,500hz, and goes up to 12,000hz on '99 and '00 cars, or 1,500 to 11,250hz on '97-'98 cars. Now, the actual tables used in 2001+ cars that come with these larger MAFs range from 750 to 12,000hz, so what do we do? Well, 750-1500hz is really low flow so we'll just ignore that whole section of the data since our computer will never understand it. If you have a 97-98 year car, that leaves you with the 11,250-12,000 range that will be unconvertible since no entries can exist for that range. What this means is with the new maf table, once you hit the 11,250hz your maf will flatline. Now, you may say that your car ran fine before with that limit so it also will with the new maf, but that is not the case. Read on... The 97-2000 maf says that 11,250hz is 428.52 gms/sec of airflow. Well, the new 2001+ maf will say that 11,250hz is 359.16, which means that on a 97 or 98 year model car, your maximum measured airflow will drop by over 68gms/sec (from 428 to 359). This is why for '97 and '98 year models you should buy the recalibrated maf, or do not do this mod at all! 1999 and 2000 model cars will have the extended maf table up to 12,000hz and their ceiling will remain within the same threshold as it was stock, which is what we want. |
2001+ Maf Tables
Note: These are only needed if you purchased a non recalibrated MAF
| Freq (Hz) | 1500 | 1625 | 1750 | 1875 | 2000 | 2125 | 2250 | 2375 | 2500 | 2625 | 2750 | 2875 | 3000 | 3125 | 3250 | 3375 | 3500 |
| Screened | 1.48 | 1.8 | 2.13 | 2.49 | 2.89 | 3.33 | 3.8 | 4.34 | 4.91 | 5.54 | 6.22 | 6.95 | 7.73 | 8.56 | 9.45 | 10.38 | 11.38 |
| Descreened | 1.42 | 1.76 | 2.1 | 2.48 | 2.86 | 3.26 | 3.7 | 4.18 | 4.71 | 5.31 | 5.97 | 6.68 | 7.43 | 8.23 | 9.08 | 9.97 | 10.91 |
| Freq (Hz) | 3625 | 3750 | 3875 | 4000 | 4125 | 4250 | 4375 | 4500 | 4625 | 4750 | 4875 | 5000 | 5125 | 5250 | 5375 | 5500 | 5625 |
| Screened | 12.45 | 13.6 | 14.85 | 16.21 | 17.7 | 19.32 | 21.02 | 22.77 | 24.54 | 26.43 | 28.41 | 30.49 | 32.66 | 34.95 | 37.36 | 39.9 | 42.62 |
| Descreened | 11.93 | 13.05 | 14.27 | 15.59 | 16.98 | 18.47 | 20.05 | 21.72 | 23.48 | 25.34 | 27.28 | 29.34 | 31.48 | 33.74 | 36.11 | 38.62 | 41.3 |
| Freq (Hz) | 5750 | 5875 | 6000 | 6125 | 6250 | 6375 | 6500 | 6625 | 6750 | 6875 | 7000 | 7125 | 7250 | 7375 | 7500 | 7625 | 7750 |
| Screened | 45.48 | 48.5 | 51.66 | 54.98 | 58.44 | 62.05 | 65.82 | 69.73 | 73.8 | 78.03 | 82.41 | 86.94 | 91.63 | 96.49 | 101.51 | 106.71 | 112.09 |
| Descreened | 44.17 | 47.2 | 50.4 | 53.77 | 57.3 | 61.01 | 64.88 | 68.91 | 73.12 | 77.47 | 81.97 | 86.63 | 91.45 | 96.43 | 101.59 | 106.9 | 112.36 |
| Freq (Hz) | 7875 | 8000 | 8125 | 8250 | 8375 | 8500 | 8625 | 8750 | 8875 | 9000 | 9125 | 9250 | 9375 | 9500 | 9625 | 9750 | 9875 |
| Screened | 117.63 | 123.35 | 129.24 | 135.3 | 141.53 | 147.87 | 154.41 | 161.15 | 168.08 | 175.22 | 182.58 | 190.23 | 198.21 | 206.34 | 214.8 | 223.52 | 232.52 |
| Descreened | 118.01 | 123.83 | 129.84 | 136.05 | 142.48 | 149.13 | 155.98 | 163.06 | 170.38 | 177.92 | 185.7 | 193.73 | 201.99 | 210.52 | 219.3 | 228.34 | 237.64 |
| Freq (Hz) | 10000 | 10125 | 10250 | 10375 | 10500 | 10625 | 10750 | 10875 | 11000 | 11125 | 11250 | 11375 | 11500 | 11625 | 11750 | 11875 | 12000 |
| Screened | 241.83 | 251.34 | 261.13 | 271.19 | 281.53 | 292.15 | 303.05 | 314.25 | 325.73 | 337.51 | 349.59 | 361.96 | 374.64 | 387.63 | 400.92 | 414.53 | 428.46 |
| Descreened | 247.23 | 257.06 | 267.16 | 277.56 | 288.25 | 299.25 | 310.55 | 322.2 | 334.16 | 346.49 | 359.16 | 372.22 | 385.66 | 399.51 | 413.77 | 428.45 | 443.6 |

|
Optional - Clean wiringAnother option for the extra clean look, is to chop up the adapter harness and solder the wires together. This eliminates the adapter plugs and will make it look just like OEM. I personally chose to go this route in the end to make everything appear OEM. The wiring adapter from PACE parts is the cheapest way to get the connectors you need. |
Frequently Asked Questions
1) Is this conversion possible on an F-body?
Yes, it is. The conversion will be nearly identical to the corvette conversion, except that you will want to find an air lid setup to handle the larger diameter maf.2) Will this conversion get me more horsepower?
On most cars, I'd have to guess that the horsepower difference will be very minimal. On some of the more modified cars, I believe that you'll be able to get more flow through this piece than the older smaller diameter mafs. At the low price point of the conversion, its definitely a low-risk modification.E-Mail me if you used or enjoyed this article
Feedback and hearing people's experiences when using my instructions is very important to me. If you used these instructions, drop me a line and let me know how it all went.- jmX